Monday, November 25, 2013

Catching Up- November 2013

Here are more random items from the past month that I didn't get onto the blog!

The attic/media room project is moving along (currently getting more estimates for sheetrock, and trying to schedule the insulation guys!)

In the meantime, we've had other little things keeping us busy...

Our youngest's birthday party was last month- it was a Scooby Doo theme (see more here and here).

We lucked out with great weather and were able to have it entirely outside- a very good thing, considering the upstairs hallway is STILL in bad shape!


Just in case guests needed to use the bathroom, I hung these signs up...


Since then, we're working more on the hallway... There's still one wall with wallpaper to remove.  This got put on hold when I got two herniated discs in my neck from removing the majority of it!  I'm not looking forward to jumping back into that!

But the rest of the hallway has gotten a first round of sanding and spackling.  I took a break one day and came back to find this...
I was told it's "bear tracks in the house!"  At least we're still having fun around here!


We were given some house plants from my aunt & uncle!
One is a huge fica tree that's at least 20 years old!  Some of the branches were beat up from the move, so Mike trimmed it back, and braided it's trunk a little further (the bottom was already braided).
Here it is during the trimming process-->
(I'll have to update with a finished photo...)
We also got a pretty palm...

You can see the rocks we put in the planters.

These are serving two purposes:
1- keeping the plant standing up-right
2- keeping our cat out of the dirt!


There's also a HUGE peace lily plant that I need to get photos of... Mike was dividing and re-potting it.


Last bit of news is that we ordered the flooring for the attic!
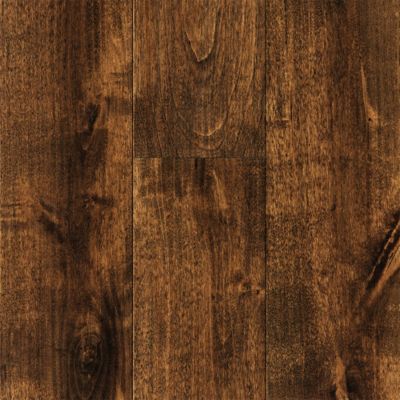
3/4" x 4-3/4" Chocolate BirchThe requirements was for it to be 3/4" hardwood (so that we can re-finish it if we ever need to).
Here's what we ended up with... it's a nice chocolate-y brown, and the boards are 4-3/4" width, so don't look too narrow as some of the other options did.

The best part is that it was on sale at Lumber Liquidator!

Now we wait for it to come in... should be around the second week of December.


I need to get a "To Do" list going on this project, it's just so satisfying to cross things off!  Maybe later this week!

Wednesday, November 20, 2013

Raising the Roof...

Well, not really... but I thought it sounded better than "Raising the Ceiling"!

So, now that you know the plan for exposed beams in the future media room... that got Mike thinking.  And that got him ripping...

He was off from work one day, and I came home to find the ceiling of the third floor hallway ripped down!  I was a little upset with him- but only because he didn't take before or during photos.  So, I'll do my best with "before" photos being from the light fixture getting installed (yep- that newly installed fixture had to come back down!)
BEFORE
AFTER


BEFORE
AFTER


I thought the idea itself is fantastic!  This will make that low ceiling hallway feel much more open!  But it's definitely in the "looking worse before it can look better" stage.


From hallway, looking toward unfinished
 storage area
Mike has built support beams/framing so that we can sheetrock up to the roof peak & enclose the new media room.

He had to do the same thing on the other side, to extend the wall seperating the unfinished storage area from the hallway.
Here he also needed to put up plywood so that the spray foam insulation has something to stick to.

Mike also has been doing this under the eaves, where the unfinished section will meet the finished section's storage area (for insulation purposes).


Of course, we're running into little unexpected issues... like the fact that the molding medallions were cut in half where they met the old ceiling (we were hoping they'd be whole underneath the plaster!)

We'll need to come up with a better solution there!


Also, there's the electric wire that runs down the stairs for the light switch...  It was fine when the ceiling was much lower, but now we need to run it up higher, and it's about 3 inches too short!  Grrr... just 3 inches!!!

Monday, November 18, 2013

Attic Beams

While I've posted photos that show the exposed beams in the attic, I don't think I've specifically called them out...

They are the original beams from when the house was built (1760-1790ish).  There are roman numerals carved into them, showing the order they were to be built!
Unfortunately, they don't show up that well in the compressed photos...
IIIX


IIX

X

We've decided that we're going to leave the beams exposed for the finished room.  The drywall will go up from the knee wall, along the slanted roof, up to the very top triangle where the electrical boxes have been installed (it will be flat at the very peak of the roof for the full length of the room).  This should make the room feel much taller than if we were to install the sheetrock across the bottom of the beams.

I think "white washing" the beams will help make the room feel more airy, and not as divided by the horizontal beams.  It should also mask the difference in look of the newer support beams that have been installed more recently (yet still prior to us).
And I just love that the history of the house's construction won't be covered up!

Friday, November 15, 2013

Radiator Handle Swap

I apologize that I've been slacking on my posts lately!  But rest assured, progress is being made :)  I just have to find some time to sit down and get the photos loaded & posts written up!

Today I have a quick addition to the attic radiator post...
I can't believe I forgot the part about the valve/handle not working anymore!  It actually flew off at one point, and there was a little piece missing.
Handle is on top-left side of radiator

Mike tried to find a replacement piece at Lowe's, but ended up having to buy a whole new valve.  I don't love it, but it's not terrible!


In fact, I was actually a little happy about this! The attic radiator is the same as the one in the bathroom (I could tell from the fancy markings on it).

The bathroom radiator handle was pretty beat up & the wood was chipped.  It kept snagging on the towels when we put them on the radiator to warm them.

So, Mike took the attic handle and replaced the beat-up parts on the bathroom radiator handle.  It looks so much better, and no more snags to my towels!


Monday, November 4, 2013

Back to the Attic- radiator re-installed

We've spent the last couple of weekends back in the attic.

First item up was re-installing the radiator... it had been located out way too far from the wall.   In order to move the radiator back closer to the walls we needed to shorten the pipes that ran under the eaves.

Mike had trouble unscrewing the pipes back in the spring when he removed the radiator to install the subflooring, so had cut them. Now that it's getting cold... we needed to be able to put the heat on.  So, this got bumped to the front of the project list!

Working under the eaves, it took a lot of muscle and use of his reciprocating saw, but Mike got the old pipes out and replaced with new.


Then my mom painted the radiator.  We had the silver Rustoleum paint left over from the bathroom radiator.

So, still a long way from finished... but inching forward!
Before- green radiator is
under the light bulb.
After


Some more shots of the room at this stage...
View from the doorway

Reverse view
(from the far left corner of previous photo)